Watching a massive Queenslander glide down the highway in the middle of the night is a sight that stops traffic. It looks like a magic trick. A solid, heavy structure that was sitting on a block of land yesterday is suddenly mobile, ready to begin a new life in a completely different location. But for the prospective buyer, the magic quickly gives way to practical decision-making.
You need to know exactly how a house relocation process works in the real world. Buying a removal home is an excellent way to achieve property ownership while preserving architectural history. However, it requires precise planning, expert coordination, and an understanding of every project stage from the initial house pickup to the final foundation installation.
This removal home case study takes you behind the scenes of a real-world project. You will see exactly what it takes to execute a successful removal home transformation. By understanding the common mistakes and planning your project with care, you can avoid unnecessary costs and delays.
Project Overview
This removal home project example involves a classic timber-framed Queenslander, originally located in a densely populated suburban street in Brisbane. The client purchased the home with the goal of relocating it to a spacious rural property in the Darling Downs region.
Their objective was clear. They wanted a character-filled family home that offered more space and historic charm than a standard new build, at a fraction of the cost.
A project of this scale requires military-level precision. The process involved four distinct stages: selecting and preparing the house for pickup, executing the complex transport logistics, completing the site preparation, and finally, managing the placement and re-stumping house relocation phase. Here is how the project unfolded.
The Client’s Starting Point
The client chose a removal home for two primary reasons: speed and character. Building a new home from scratch on their rural property would have taken over twelve months and exceeded their strict budget.
They wanted the VJ walls, high ceilings, and hardwood floors that define traditional Queenslanders. However, they also faced significant initial challenges. They needed to secure financing, navigate local council approvals across two different jurisdictions, and prepare an undeveloped block of land to receive a full-sized house.
Budget control was their top priority. They needed to know all fixed costs upfront to ensure they had sufficient funds remaining for their planned renovation updates.
Step 1 — Selecting and Preparing the Home
Not every house can survive a highway journey. Choosing the right home is a strategic decision that dictates your budget, your timeline, and the ultimate feasibility of your project.
The client engaged our team to conduct a comprehensive structural inspection before finalising the purchase. We checked the timber framing, roof structure, and overall integrity to ensure the home could withstand the stresses of lifting and transport.
Once selected, pre-move preparation began. We systematically disconnected all services, including electrical, water, and plumbing. To meet transport height and width restrictions, the roof was partially lowered, and the front verandah was carefully detached. Internal cross-bracing was installed throughout the home. This prevents the structure from twisting or racking during the lift.
Step 2 — Transport and Relocation Process
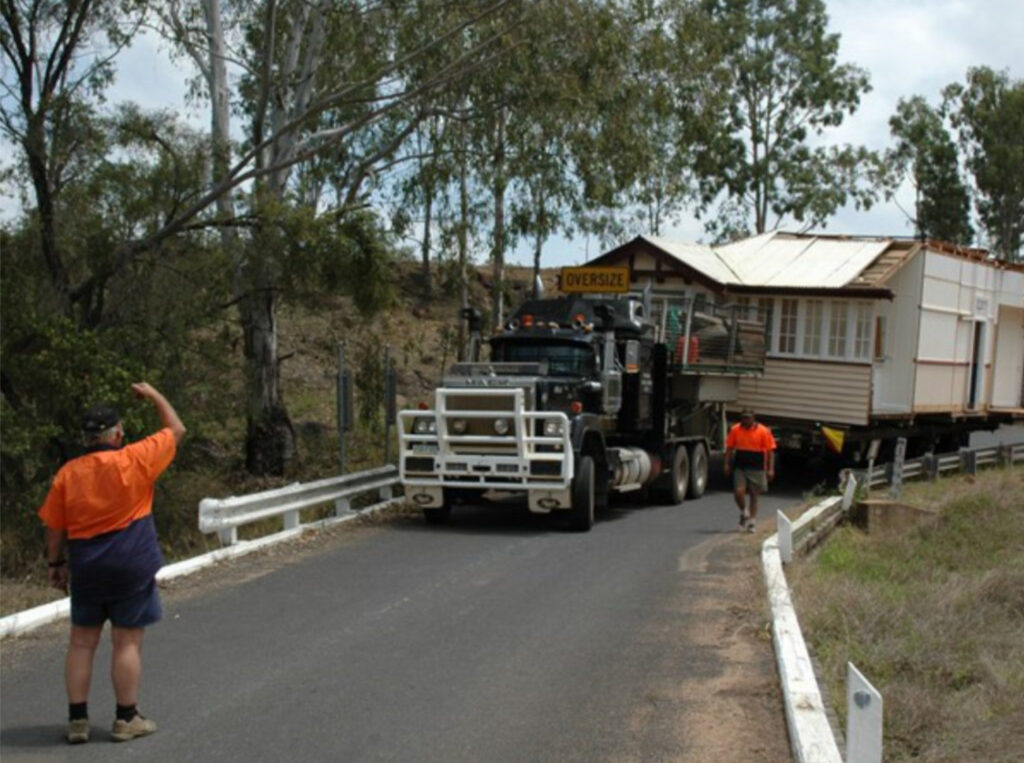
The transport phase is where careful planning becomes visible. Relocating a Queenslander across regional highways requires exhaustive transport logistics and route planning.
Our team secured the necessary road permits from the Department of Transport, coordinating with local police for escort vehicles and utility companies to manage overhead power lines. Because of the home’s width, the structure was split into two manageable sections.
The house pickup occurred at midnight to minimise traffic disruption. Hydraulic jacks lifted the sections onto specialised heavy-duty transport dollies. The journey took two nights, navigating narrow suburban streets before hitting the open highway. Despite minor weather delays, the convoy arrived safely at the destination site right on schedule.
Step 3 — Site Preparation
A successful installation relies entirely on rigorous site preparation. While the house was in transit, earthmoving contractors prepared the receiving block.
The client’s rural property required significant site levelling to create a flat, stable pad. We mapped out the delivery access route to ensure our trucks and lifting equipment could maneuver without getting bogged in the soft soil.
Foundation planning was finalised based on specific geotechnical soil tests. The test assigns a Site Classification to your land. This tells you how much the soil is expected to move with moisture changes. Based on this data, we mapped out the precise stumping grid to support the two sections of the house once they arrived.
Step 4 — Placement and Re-Stumping (Core Transformation Stage)
This is the most visually engaging stage of the entire project. Re-stumping is the stage that transforms a transported home from a structure sitting on temporary supports into a properly founded, structurally secure dwelling.
Upon arrival, the two sections were carefully positioned over the prepared site. Using a combination of hydraulic jacks and precise crane placement, the sections were rejoined with millimetre accuracy.
Next came the foundation installation. We installed engineered steel adjustable stumps. Steel adjustable stumps are the optimal choice for most relocated homes. They allow precise setting and future height correction without excavation if the site’s soil conditions cause seasonal movement. The home’s floor frame was securely bolted to the new stumps, perfectly levelled to ensure doors and windows operated smoothly.
Step 5 — Final Adjustments and Completion
With the home securely on its new foundations, we executed the final structural checks. The roof was re-pitched, the front verandah reattached, and the internal bracing removed.
We managed the compliance phase, coordinating with a private building certifier to ensure all structural tie-downs and bracing met local wind rating requirements. Plumbers and electricians were then brought in to reconnect the home to the property’s newly installed septic system and power grid.
This marked the official transition from a complex transport phase to a secure, livable home ready for the client’s internal renovations.
Before and After Transformation (Visual Section)
Never rely on a visual inspection alone. Some buyers walk through a removal home, see fresh paint, and assume the house is solid. This is a fast way to inherit hidden problems.
Before the relocation, this Queenslander was structurally sound but visually tired. It sat awkwardly on a cramped suburban block, hemmed in by modern brick builds. Its heritage features were overshadowed by overgrown gardens and a sagging front staircase.
After placement on the rural block, the transformation was undeniable. Elevated on brand-new adjustable steel stumps, the home commanded the landscape. The before and after contrast highlighted the sheer potential of the property. With the structure perfectly levelled and structurally certified, the clients were immediately ready to begin painting and polishing the hardwood floors.
Timeline and Key Milestones
Understanding timelines prevents costly assumptions. Here is the realistic timeline for this project:
- Planning and Approvals (16 weeks): Securing council development applications, building approvals, and financing.
- Site and House Preparation (3 weeks): Disconnecting services, bracing the home, and preparing the rural block.
- Transport (2 days): Moving the house over two consecutive nights.
- Installation and Re-stumping (3 weeks): Rejoining the house, installing steel stumps, and completing structural tie-downs.
From the day council approval was granted to the day the clients walked through the front door, the physical work took just over six weeks.
Challenges and How They Were Managed
Every major construction project faces hurdles. Project coordination is the key to overcoming them.
During this project, unseasonal heavy rain threatened to turn the delivery access path into mud. We paused the transport by 48 hours to let the ground dry, preventing our trucks from sinking under the weight of the house.
We also managed tight coordination between the local council and our private certifiers to ensure the paperwork for the newly split sections aligned perfectly with the building code. By communicating directly with the client’s local tradespeople, we ensured the plumbers and electricians were on standby the moment the house was structurally secured.
Key Takeaways for Buyers
What can you learn from this removal home transformation? First, the quality of the re-stumping work has the most profound long-term impact on the home’s structural performance. Cutting corners on the foundation exposes you to significant costs down the line.
Second, engage experts early. Understanding council requirements early can help avoid delays when planning a removal home project. Work with experienced removal contractors who handle the logistics, the permits, and the engineering natively. This guarantees your home arrives safely and sits securely for decades to come.
Frequently Asked Questions
How long does it take to relocate a house?
The physical move usually happens overnight. However, the entire process—including council approvals, site preparation, transport, and re-stumping—typically takes between 4 to 6 months.
What is involved in re-stumping a house?
Re-stumping involves lifting the home, removing temporary supports, boring new holes, pouring concrete footings, and installing new permanent stumps (usually adjustable steel) to perfectly level and secure the structure.
Can a house be moved in one piece?
It depends entirely on the size of the house and the width of the transport route. Many standard homes are moved in one piece, but wider homes are often cut into two or more sections to comply with road regulations.
What are the risks of house relocation?
The primary risks include structural damage during lifting, weather delays, and site access issues. You mitigate these risks by using a licensed, highly experienced house removal contractor.
How much planning is required for a removal home?
Extensive planning is mandatory. You need to secure financing, assess site feasibility, obtain soil tests, draft engineering plans, and secure council approvals before any physical work begins.
What happens after a home is delivered to site?
Once delivered, the home is maneuvered into position, placed on its permanent stumps, structurally tied down, and re-joined if it was cut. Finally, services are connected and council issues a final compliance certificate.
Ready to Start Your Relocation Project?
Buying and relocating a house is a significant undertaking, but the financial and architectural rewards are unmatched. If you are ready to explore your options, browse our removal homes for sale or view our currently available homes.If you want to understand how our expert team can manage your house relocation services, read more about our team. Ready to discuss your specific site? Contact our team today to start your own removal home transformation.
